
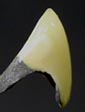
Q1.In case of collarless (margin porcelain), the margin part was shrunk after glazing.
How can it be repaired?
Use the repair porcelain, SUP-D.
Concerning A0 to A2 shades, use Stain White (powder) after mixing it well. Set the firing temperature as instructed in the schedule (790 to 830℃).
* The mixing composition ratio is as follows:
| Shade | SUP-D | Stain Powder White |
| A0 | 4 | 1 |
| A1 | 5 | 1 |
| A2 | 6 | 1 |
| A3 | 1 | 0 |
| A3.5 | 1 | 0 |
| A4 | 1 | 0 |
* Powder Stain can be purchased alone.
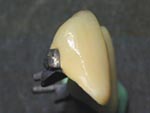
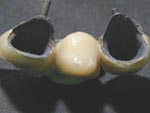
Q2.When using Opaque Dentine porcelain for the mucous membrane part of pontic in bridge case, the color of cervical part is different from that of the adjacent teeth, which are abutment teeth, because of the high transparency of ZEO CE LIGHT. Are there any solutions?
As metal is not used for the cervical part of pontic, the transparency of this part can be too strong. Therefore, it is difficult to adjust its transparency by using Opaque Dentine porcelain alone. There are two methods for adjustment.
(1) Use with Margin porcelain
First, build up Margin porcelain which is suitable for the shade of porcelain to be applied to the mucous membrane part of pontic. Then, fire it at 910℃. Build up Opaque Dentine on the front cervical part of the margin.
Note: Firing temperature of Margin porcelain is usually 900℃. However, fire it at 910℃ in this case, as the amount of its build up is large.
(2) Combine with Accent porcelain
Use Accent porcelain (Occlusal-Orange or Milky) and mix it well with Opaque Dentine porcelain. If opacity and dark color is preferable, use Occlusal-Orange. If you do not want to change the color tone or make it whiter, use Milky.
The shade table shows combination ratio for each porcelain. The area in gray is the best ratio. Be sure to conduct test firing before use. If you prefer darker or lighter color tone than in the recommended conditions, change combination ratio.
< Shade Table of Pontic Opaque Dentine >
| Shade | A0 | A1 | A2 | A3 | A3.5 | A4 |
| Best condition ratio | OD-A0 2 Milky 1 |
OD-A1 2 Milky 1 |
OD-A2 2 Milky 1 |
OD-A3 2 Oc-Or * 1 |
OD-A3.5 2 Oc-Or * 1 |
OD-A4 2 Oc-Or * 1 |
| Second recommended ratio |
- | - | OD-A2 2 Oc-Or * 1 |
OD-A3 3 Oc-Or * 1 |
OD-A3.5 3 Oc-Or * 1 |
OD-A4 2 Oc-Or * 1 |
| Color tone ** | - | - | High | Low | Low | High |
| Shade | B0 | B1 | B2 | B3 | B4 |
| Best condition ratio | OD-B0 2 Milky 1 |
OD-B1 2 Milky 1 |
OD-B2 2 Milky 1 |
OD-B3 2 Oc-Or * 1 |
OD-B4 2 Oc-Or * 1 |
| Second recommended ratio |
- | - | OD-B2 3 Oc-Or * 1 |
OD-B3 3 Oc-Or * 1 |
OD-B4 3 Oc-Or * 1 |
| Color tone ** | - | - | High | Low | High |
| Shade | C1 | C2 | C3 | C4 |
| Best condition ratio | OD-C1 3 Oc-Or * 1 |
OD-C2 3 Oc-Or * 1 |
OD-C3 2 Oc-Or * 1 |
OD-C4 2 Oc-Or * 1 |
| Second recommended ratio |
OD-C1 2 Milky 1 |
OD-C2 3 Milky 1 |
OD-C3 3 Oc-Or * 1 |
OD-C4 2 Oc-Or * 1 |
| Color tone ** | Low | Low | High | High |
| Shade | D2 | D3 | D4 |
| Best condition ratio | OD-D2 2 Milky 1 |
OD-D3 3 Oc-Or * 1 |
OD-4 2 Oc-Or * 1 |
| Second recommended ratio |
OD-D2 3 Oc-Or *1 |
OD-D3 2 Oc-Or * 1 |
OD-D4 2 Oc-Or * 1 |
| Color tone ** | High | High | High |
Q3.Opacification was found after firing.
This can sometimes occur when porcelain is added on to remarkably dried surface of porcelain layer (especially to the area where plaster or tissue directly faces). This occurs mainly on the contact area or basal surface of pontic.
Furthermore, this also can be found on the interface area of porcelain layers where porcelain was added on to the surface of body porcelain, which was once fired at lower temperature than in the basic firing schedule. For example, this occurs on the interface area between Margin porcelain or Opaque Dentine fired at low temperatures and re-fired Dentine.
Due to capillary phenomenon, rough surface of porcelain layer which is dried or not fired enough due to low firing temperature absorbs moisture, minute particles or emulsifier having almost the same particle size of minute particles from porcelain which is added on. As a result, layers of minute emulsifier are created around the interface area, and this can result in opacification.
Fine emulsifier has been used for ZEO CE LIGHT. Therefore, it is possible to emulsify porcelain by adding a small amount of emulsifier without changing its original properties. Furthermore, the color of natural teeth, especially opalescence, can be reproduced uniformly.
Tips are
Q4.When should we use ZEO CE LIGHT A0 or B0 shade?
Although the following cases are rare, A0 and B0 can be used in the situations below:
ZEO CE LIGHT A0 and B0 shades are developed for color adjustment for bleaching and whitening color.

YAMAKIN will respond to inquiries on the business day.
If we receive any inquiries during company holidays such as
Saturdays, Sundays, public holidays in Japan,
we will reply to you on the next day.
Business Hours: Weekday 8:45am to 17:45pm.
News
Photo Gallery
![]()
1090-3 Kamibun, Kagami-cho, Konan-shi, Kochi 781-5451 Japan
:
: https://www.yamakin-global.com
+81-88-888-0290
All Rights Reserved.
PAGE TOP


